THE WHY?
This is not really a why, but more of a must in my situation. Having had my 944 for little more than six months I began to notice a small fuel leak under the rear of the car. And after a bit of reading on the web it seems early 944's are suseptable to this due to the metal fuel tank they use, which either corrodes or develops cracks due to the flexing caused by the fuel vacuum. So to get to the fuel tank the transmission has to come off. This got me thinking about what else I could do to the transmission if I was going to have to go to all this trouble. So, I decided to change the shifter mechanism, swap out the transmission oil, change the transmission mounts, re-grease the CV joints on the axles and underseal the body work. If you're gonna do a job do it properly.
THE TASK
It may sound daunting but the removal of the transmission is relatively simple. Removing the transmission took me about 6-8 hours being a first timer at this task.
You'll need the following:
A pair of long nosed pliers
Socket set
Spanners
A trolley jack or two
A plank of wood (the length of the transmission)
Long heavy duty zip ties
Flat bladed screwdriver
Long screwdriver or length of tubing (Approx 30cm long)
Allen key set (8mm allen key or wrench for transmission to trans-axle coupling removal)
Spline bit set (8mm spline bit for drive-shafts removal)
A second pair of hands to help with lowering the transmission.
THE HOW TO
(Amateur mechanic Job Time approx: 6-8 hours)
There's the Porsche mechanics way of doing it and then there's my way. I used that alongside the Porsche Haynes manual which is just about OK but a bit light on details.
Jack the rear of the car up and support it on axle stands at their highest setting.
Remove the gear knob and leather shroud by prising up the edge where it meets the centre console with a flat bladed screwdriver. Underneath you'll find a rubber shroud which removes in exactly the same way; exposing a black block with a sprung clip. Before the gear knob will come off completely you'll need to release the clip on the black block with the screwdriver. This will expose the mechanism where the gear stick meets the shifter rod.
Now get under the car and locate the shifter mechanism (located on the top of the transmission between the two rubber transmission mounts). There should be a rubber boot to slide towards the rear of the car that exposes the nut that connects the shifter rod to the shifter linkage.

There will probably be a piece of wire threaded through the nut which you will need to untwine before releasing the nut with a 13mm socket. You can now separate the linkage from the shifter rod with a bit of wiggling and pushing it towards the front of the car.
Now get back inside the car and remove the circlip that is used to secure the shifter rod to the gear stick with a pair of long nosed pliers and unhook the rod from the stick. You should now twist the gear stick 90 degrees and lay it over as far towards the passenger seat as possible (See photo below). Still inside the car, next get hold of the black shifter rod and twist it 90 degrees onto its side and push it towards the front of the car and through the sponge sound absorbing material under the radio (See photo below).


Once you've done this you will now need to get back under the car and use a long screwdriver or piece of tube to push the end of the shifter rod all the way through plastic tube located at the top of the transmission bell housing (It should be pushed forward by about 30cm's).
The next stage involves removing the two plastic covers on the bottom of the transmission bell housing (shown below), just prise them out with a screwdriver. This exposes the 'coupling' between the transmission and the trans-axle that runs the length of the car. There's an allen bolt at either end of the coupling (one per hole).
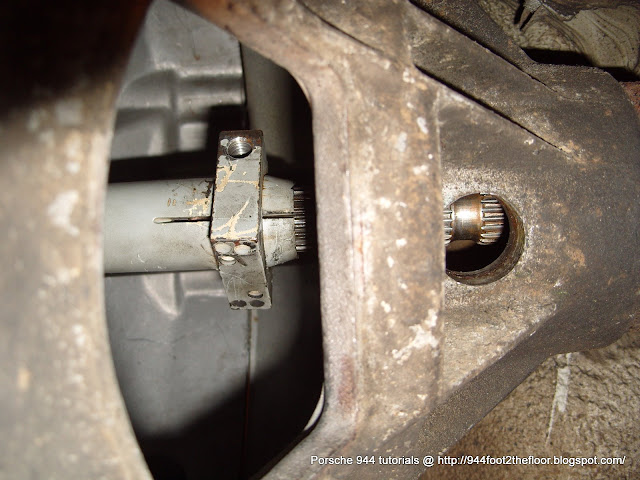
Before you remove the bolts mark a line across the width of the splined (toothed) part of the axle at the transmission end of the coupling with a permanent pen. This will help you slide the coupling back into the same spot when you come to reassemble as you'll notice that the bolts in the coupling actually slide through indentations machine in the axle itself. These indentations are there to prevent the coupling sliding up and down the axle and to make sure the coupling sits equally between the trans axle and the axle going into the transmission.


THE HOW TO
(Amateur mechanic Job Time approx: 6-8 hours)
There's the Porsche mechanics way of doing it and then there's my way. I used that alongside the Porsche Haynes manual which is just about OK but a bit light on details.
Jack the rear of the car up and support it on axle stands at their highest setting.
Remove the gear knob and leather shroud by prising up the edge where it meets the centre console with a flat bladed screwdriver. Underneath you'll find a rubber shroud which removes in exactly the same way; exposing a black block with a sprung clip. Before the gear knob will come off completely you'll need to release the clip on the black block with the screwdriver. This will expose the mechanism where the gear stick meets the shifter rod.
Now get under the car and locate the shifter mechanism (located on the top of the transmission between the two rubber transmission mounts). There should be a rubber boot to slide towards the rear of the car that exposes the nut that connects the shifter rod to the shifter linkage.

There will probably be a piece of wire threaded through the nut which you will need to untwine before releasing the nut with a 13mm socket. You can now separate the linkage from the shifter rod with a bit of wiggling and pushing it towards the front of the car.
Now get back inside the car and remove the circlip that is used to secure the shifter rod to the gear stick with a pair of long nosed pliers and unhook the rod from the stick. You should now twist the gear stick 90 degrees and lay it over as far towards the passenger seat as possible (See photo below). Still inside the car, next get hold of the black shifter rod and twist it 90 degrees onto its side and push it towards the front of the car and through the sponge sound absorbing material under the radio (See photo below).

Once you've done this you will now need to get back under the car and use a long screwdriver or piece of tube to push the end of the shifter rod all the way through plastic tube located at the top of the transmission bell housing (It should be pushed forward by about 30cm's).
The next stage involves removing the two plastic covers on the bottom of the transmission bell housing (shown below), just prise them out with a screwdriver. This exposes the 'coupling' between the transmission and the trans-axle that runs the length of the car. There's an allen bolt at either end of the coupling (one per hole).

Before you remove the bolts mark a line across the width of the splined (toothed) part of the axle at the transmission end of the coupling with a permanent pen. This will help you slide the coupling back into the same spot when you come to reassemble as you'll notice that the bolts in the coupling actually slide through indentations machine in the axle itself. These indentations are there to prevent the coupling sliding up and down the axle and to make sure the coupling sits equally between the trans axle and the axle going into the transmission.
Now to undo the allen bolts (with a long 8mm allen key or wrench) you will need to rotate the trans-axle by hand so you can get to them squarely. To do this you'll want to wedge something onto the clutch pedal (See photo below).
 Once you've undone the bolts slide the coupling towards the rear of the car until you can see the gap between the spline of the gear box and the trans-axle (As shown below), you may need to lever it in the direction using a screwdriver.

Now before we begin to unbolt the transmission theres two wires connected to the reverse gear light sensor on the top of transmission that need to be disconnected. Remember which wire goes on which terminal and simply pull them off.
Now locate the two driveshafts that go from the rear wheels and attach to the transmission. You only need to undo the spline bolts (6 per side) that attach the driveshafts to the transmission and you will need a 8mm spline bit to do it (don't use a star bit as they are a different fit). It's worth noting here that it makes the job alot easier if you remove the driveshafts altogether, plus this also gives you a chance to regrease the universal joints at each end. If you decide not to remove them then you need to hang the loose ends up so that you don't damage the the CV joint at the wheel. I did this using some long cable ties that I looped over the top of the shock absorber mounts and around the disconnected end of the shaft. I also covered the exposed end of each CV joint with a plastic bag to stop grit sticking to the grease.
 Once you've undone the bolts slide the coupling towards the rear of the car until you can see the gap between the spline of the gear box and the trans-axle (As shown below), you may need to lever it in the direction using a screwdriver.
Now before we begin to unbolt the transmission theres two wires connected to the reverse gear light sensor on the top of transmission that need to be disconnected. Remember which wire goes on which terminal and simply pull them off.
Now locate the two driveshafts that go from the rear wheels and attach to the transmission. You only need to undo the spline bolts (6 per side) that attach the driveshafts to the transmission and you will need a 8mm spline bit to do it (don't use a star bit as they are a different fit). It's worth noting here that it makes the job alot easier if you remove the driveshafts altogether, plus this also gives you a chance to regrease the universal joints at each end. If you decide not to remove them then you need to hang the loose ends up so that you don't damage the the CV joint at the wheel. I did this using some long cable ties that I looped over the top of the shock absorber mounts and around the disconnected end of the shaft. I also covered the exposed end of each CV joint with a plastic bag to stop grit sticking to the grease.
Next locate the 4 bolts around the edge of the transmission bell housing and remove them. Now all that is holding the transmission to the car is the two bolts securing the two rubber mounts to the cross member directly above the transmission (Shown in the two photos below).


Now's the point where you need and extra pair of hands. A word of warning here, the transmission is possibly the heaviest thing I have ever lifted, words cannot describe the weight of this thing.
If like me you don't have a transmission jack I modified my regular car trolley jack with a plank of wood (roughly same length of the the transmission) that I strapped to the jacks mounting post with a couple of heavy duty zip ties. I then raised the plank of wood under the tranmission. You want to centre the jack towards the rear (thinner end) of the transmission (about 2/3 along) as that's where the majority of the weight is. I then looped two heavy duty zip ties around the transmission and under the the plank of wood to make sure it would have less chance of toppling off the wooden plank. It may help to support the wooden plank with a second trolley jack if you have or can borrow one. Now's the time to undo the two transmission mount bolts. Once undone you need to simultaneously move the transmission towards the rear of the car whilst lowering very very slowly as you don't want to damage the plastic tube that the gear stick shaft uses to pass through. Your transmission should now be removed.

And finally just a quick photo of new transmission mounts (2 nearest camera) vs old mounts (the one on the end was well knackered. Really easy to replace two small bolts hold each to the transmission. Replace them one at a time with the transmission supported by jack if you don't want to remove the transmission.