Having been trying to solve a previous problem (power steering oil cooler location) some months ago via the Pelican Parts forums a member pointed out to me that from the photos I'd posted he could see that one of the bushes on the front stabilisation bar looked like it needed replacing. I'd always thought it had seen better days but since the car had passed two previous MOT's I didn't think it was that serious. Anyhow having finally cleared the list of jobs on my 944 that I considered to have higher priority I thought I go back and investigate this one.
THE TASK
You will need the following tools:
13mm Ring Spanner
13mm Socket
10mm Socket
Socket Extension Bar
Socket Ratchet Spanner
A bench vice (optional)
1600mm G-Clamp or bigger (optional)
Washing-up Liquid
THE HOW TO
(Amateur mechanic job time approx. 2 hours)
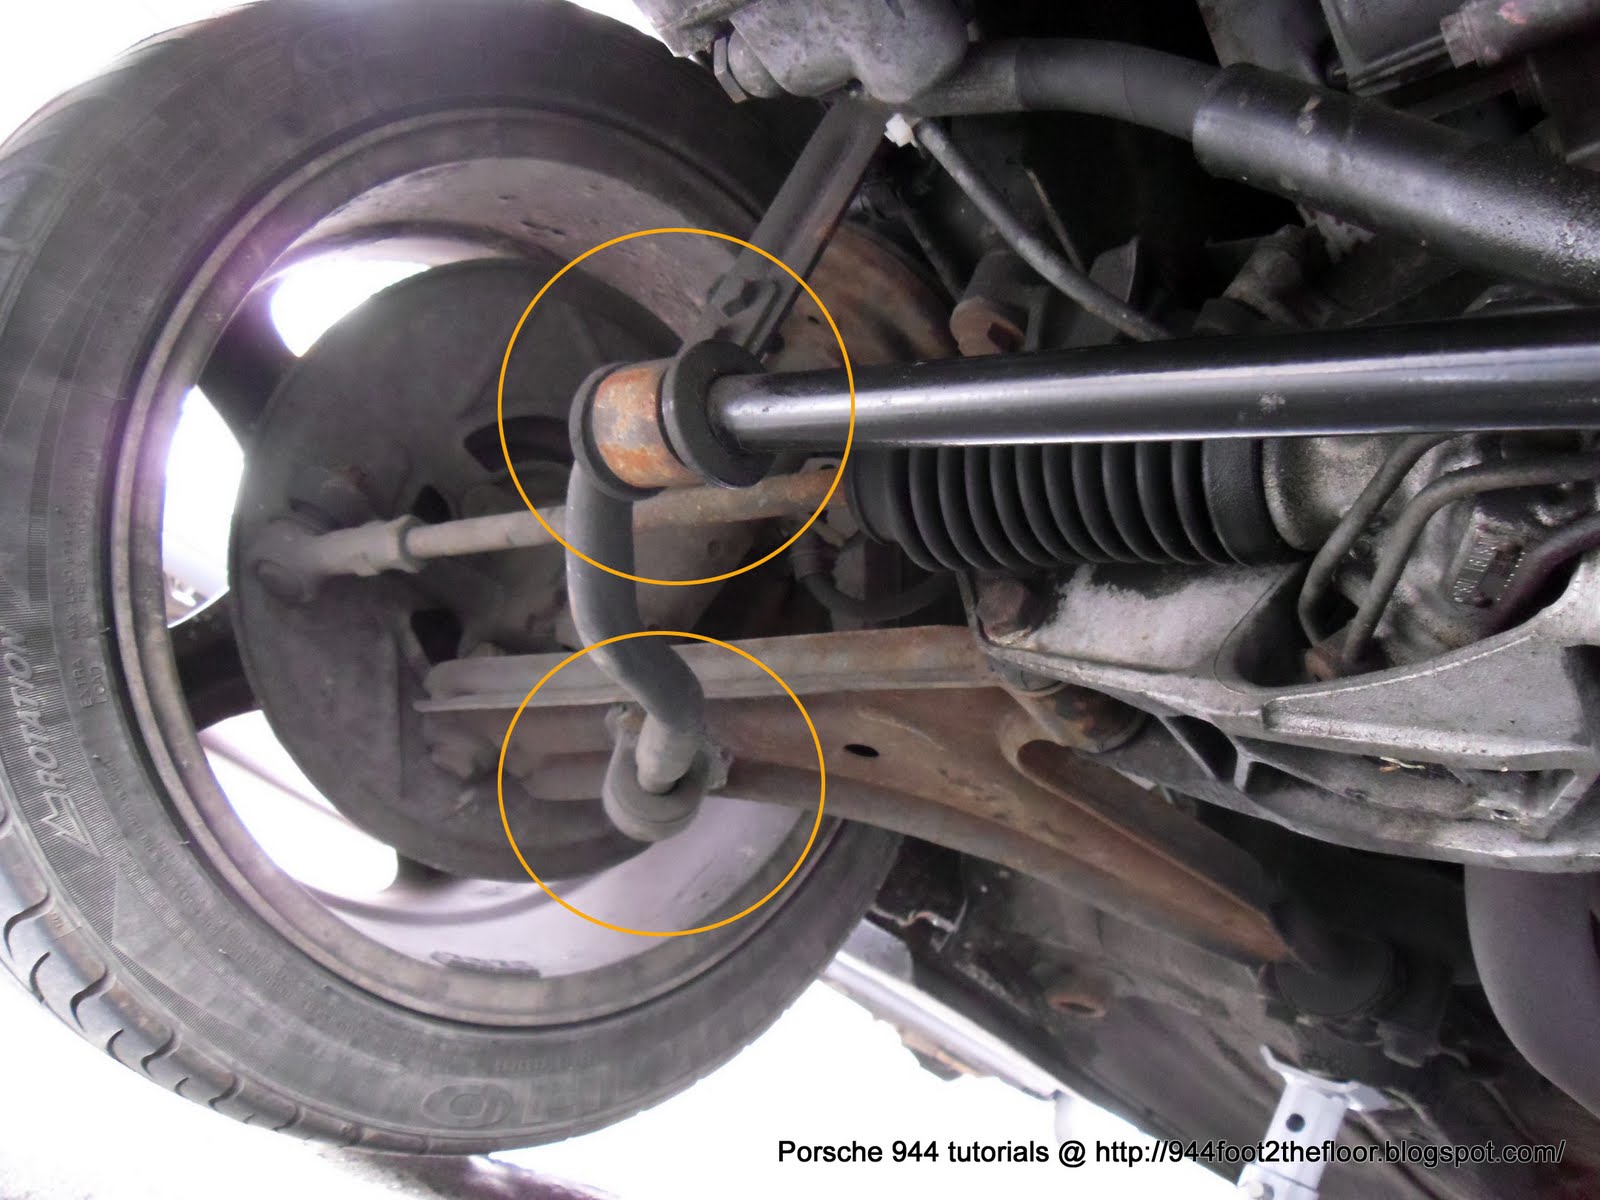
Undo the 7 x 10mm bolts that secure the engine undertray to the vehicle and remove. You will then see the stabilisation bar running the width of the vehicle secured at either end to the front wishbones and to two supports (circled in orange below) that hang down from the engine bay walls.

Before you can begin removing the stabilisation bar you need to start by either measuring the diameter of the stabilisation bar (at the points above circled in orange) or by cleaning enough grease and grime off one (or both) of the centre rubber bushes to reveal the Posche product code stamped on their edge. This is because for some unbeknown reason Porsche decided to make 3 different thickness (20mm, 21.5mm & 23mm) stabilisation bars. You then need to select the right size bushings for your bar. Mine happened to be the 23mm variety (Product code 477 411 053 J) of which I ordered two. The bushes at end of the stabilisation bar are the same diameter no matter what stabilisation bar you have, I ordered two of those too (Product code 171 411 314 A).
Here's a useful diagram and part numbers


I had very little trouble undoing the bolts on the inner brackets however when it came to one side of the bearings brackets at the wishbone I had to cut the bearing bracket off the wishbone with a grinder. Because the bearing brackets are only made from a light alloy it appeared some corrosion had gone on and because the bolt head is inset into the bracket this just chewed its way into the alloy and left me with a spinning nut.
With the stabilisation bar now removed I was able to easily pull off the bushes from either end. However the centre ones required a little bit of invention to pry open the clips for which I used the outer edge of some vice jaws and then wound out the vice as shown below.


With the clips removed the old rubber bushes simply slid off the bar. Here's a few photos comparing the old ones (centre) to the new ones (either end).


As you can clearly see the left centre bush has seen much better days. Its not surprising that it was in much worse shape than the other side as it sits on the side of the car that tends to get the worst of the oil leaks (power steering bottle, engine gasket and seal leaks).
With the bushes removed it was time to clean the stabilisation bar with some degreaser. This revealed some pitting that had occurred on the side of the worst bush.

Not wanting this to cut into the new bushes and neither wanting to purchase a new stabilisation bar I decided to smooth it off with a fine grindstone and emery paper to remove the worst of the pits.

The new centre bushes were then slid onto the bar with the aid of some washing-up liquid. And the clips were then slid over them and clamped in the vice so they were loosely secured around the bushes.
Because previously I had had to destroy one of the bearing brackets to get the bar off I ordered a complete new pair.

And the bushes to go in them.

The bushes are quite difficult to press into the bearing brackets. I found it was best to insert the top rounded edge in at an angle and then press in the sides. I obviously used washing-up liquid again and a little help from the vice being careful not to damage the rubber or alloy brackets as I pressed then right in.
The bushes have obviously been modified since the ones that were previously on the car. Here's a photo showing the new vs the old.

As you can see from the photo above the old (good) bracket that I didn't have to cut off is pretty badly corroded, so much so that I couldn't even extract the bolts from it.
The next step involved pressing the bearing brackets and their new bushings onto either end of the bar. Again I had to improvise and found that clamping the curved part of the bar in the vice and then using a G-clamp to gradually wind and push down the bush onto the bar - again with help of some fairy liquid. This is not shown in the photo but I used a small plastic disc to stop the round G-clamp jaw from damaging the rubber bush as I would it on. This was by far the most difficult part of the job.


The final part involves re-fixing the bar to the car. I started by loosely clamping up the centre bush clips to the drop down brackets and then located the bolts through the outer bearing bracket bushes and into the holes in the wishbones. Everything was then tightened up and the engine pan put back on.